How to Make a Logo From Clip Art Images
CorelDRAW provides a wealth of clip art, merely sometimes you just desire to apply your own creations. This tutorial shows how to use PowerTRACE to isolate role of a photo, making it piece of cake to use photographed objects as clip fine art.
Looking for more clipart? Browse our pick of themed clipart collections in the Discovery Center store.
CorelDRAW provides a wealth of prune art, but sometimes you lot just desire to utilize your own creations. This tutorial shows how to utilise PowerTRACE to isolate part of a photo, making it easy to utilize photographed objects equally clip art.
Looking for more than clipart? Scan our selection of themed clipart collections in the Discovery Eye store.
See what'south new in CorelDRAW Graphics Suite!
Download your FREE 15-24-hour interval trial for Windows or Mac and fuel your creative burn with the new perspective tools, flexible pattern space, progressive photograph editing tools, and much more.
How to Brand Clipart from a Photo
In this tutorial, we'll cover how to make clipart from a photograph using thePowerTRACE feature in CorelDRAW.
Click on whatever of the images below to view total-size.
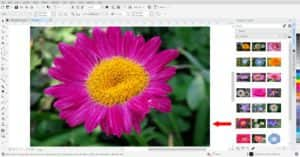
To begin, open the photograph that yous want to work with. In this case, we accept a collection of blossom photos in theCONNECT Content docker (Window >Dockers >CONNECT Content) that we will be using, and we have dragged one of them into the document.
Converting Raster Images to Vector Images
A photo (ordinarily JPG or PNG file format) is a raster image and therefore not very useful as clipart, since it tin can't be enlarged without losing sharpness and quality. The photo must exist converted to a vector image usingPowerTRACE.
Select the photo with thePick tool and get toBitmaps >Outline Trace >Clipart. This opens thePowerTRACE window, displaying the default Before and Later views.
Annotation : Under theBitmaps >Outline Trace card you volition come across that there are other tracing methods, which volition be discussed later in this tutorial.
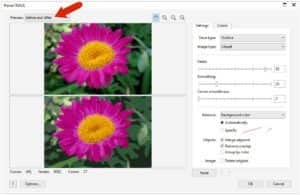
You can switch thePreview manner toLarge Preview to see more detail, orWireframe Overlay to meet the bodily vector curves and make full colors that volition be created. InWireframe Overlay manner, y'all can use the slider to adjust the translucency of the curves.
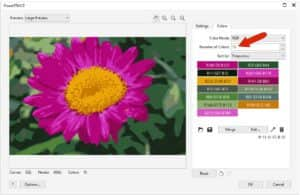
Click on theColors tab and fix the number of colors yous desire your clipart image to contain. In this case, 5 or fewer colors shows very piddling detail; increasing to nigh 13 works well. Yous can too reduce the number of colors past combining colors: press theShift fundamental while selecting them and and so clickMerge.
On theSettings tab yous tin adjust the level ofDetail,Smoothing, andCorner smoothness. Y'all tin specify a background color to remove, just since our photograph has several colors in the background, we will leave this pick alone. ChequeGroup by Color, which will brand same-color curves easy to remove as groups.

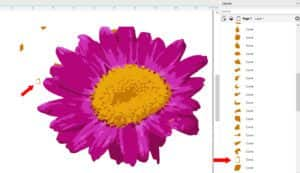
ClickOK andPowerTRACE will create the new vector object, which will exist placed directly on top of your photo. You can use thePick tool to move it aside for comparison. In theObjects docker (Window >Dockers >Objects), you lot will run into that the new vector object is a grouping comprised of multiple objects, each of which are groups of same-color curves.
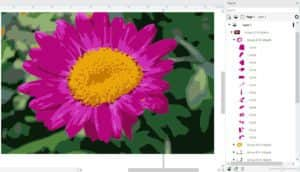
In order to isolate just the flower, we need to delete any colour groups that are not pink or yellow. Select an unwanted colour group in theObjects docker and then printingDelete on your keyboard or click theDelete icon (trashcan) at the bottom of theObjects docker.
TIP : Concur down theCtrl fundamental to select multiple objects or groups then delete all at once.
In this example, we accept a few gilt objects that need to be removed simply they are part of the color group that also contains objects we want to continue (the center of the bloom).
To remove single objects from within a group, either hold down theCtrl key and double-click on the object to select it, or select information technology in theObjects docker, then delete. Now we are left with our clipart bloom image, which we can salvage equally a .CDR file to employ in future documents.

Other Tracing Methods to Make Clipart
TheOutline Trace method has several options y'all can experiment with, to see which works all-time to make clipart from your photo. With our second bloom photo, theClipart option simply yields a maximum of fourteen colors, which isn't quite plenty to produce results nosotros're happy with.
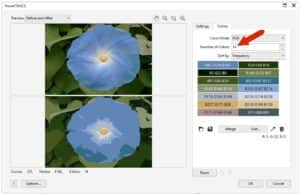
For improve results, attempt the other options, such asDetailed Logo,Loftier Quality Image, orLow Quality Image, all of which utilize different default settings. In this example, using theLow Quality Image option produces 24 colors, which works well for this clipart bloom.

Saving and Using Your Clipart
Once you take usedPowerTRACE to make clipart from a photograph, relieve the clipart image as a .CDR file. To use the clipart paradigm, simply open up as you lot would any .CDR file.
Y'all tin too create a specific folder for your clipart and add it as a content source in theCONNECT Content docker.
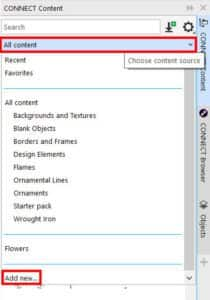
In theCONNECT Content docker, open theChoose content source dropdown and selectAdd new, then clickCreate alias. Browse to the location on your figurer where you saved your clipart binder and select it, and then click theSelect Folder button.
Now when you lot click on theCull content source dropdown you will run into the new folder y'all added. If your folder contained both .CDR files and raster images like JPG and PNG, you tin can toggle on or off theShow vector andShow raster images icons to view only 1 type if you wish.
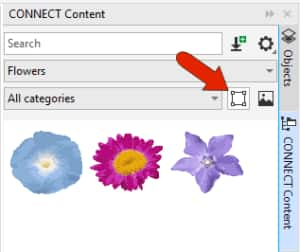
To add together images from theCONNECT Content docker to your document, simply drag them in or click theImport icon in the lesser left corner of the docker.

Source: https://learn.corel.com/tutorials/how-to-make-clipart-in-coreldraw/
Post a Comment for "How to Make a Logo From Clip Art Images"